Introduction
I will take you through my journey to deploy ML in Snowflake. With this blog, it will take you around 4 hours to get this working. Give it a shot if you want to integrate your datawarehouse tightly with your ML-Models.
Goal:
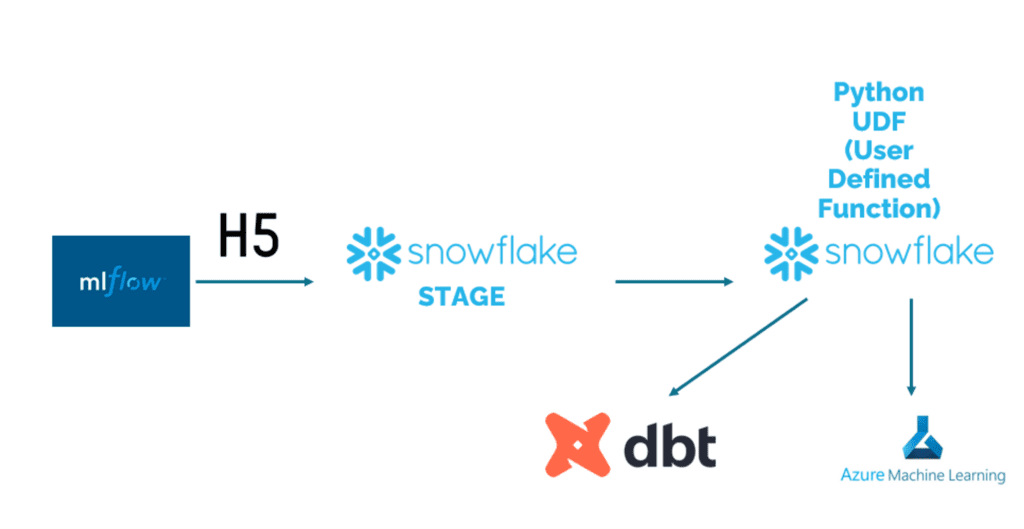
The goal of this blog is to make you combine your storage, compute and ML inference in one location: Snowflake. There are benefits and downsides to this:
Benefit: Snowflake allows you to seamlessly deploy and call models as Python User Defined Functions (UDFs) within the Snowflake environment. This means that you can easily invoke your models just like any other function, all within the same environment. Additionally, Snowflake works harmoniously with DBT, this makes it a powerful combination if you are using both technologies.
Downside: However, one downside of Snowflake Deployment is the lack of clear monitoring for model performance or uptime. You need to built and implement this yourself to ensure effective monitoring and management of your deployed models.
By leveraging Snowflake Deployment and its integration capabilities, you can streamline your model deployment process and simplify the way you interact with your models in a unified environment.
So, let’s start.
1: Setting up the Snowflake environment
To start, make sure you have an local environment like conda or virtual-env running. First, install the following packages, using pip or conda.
pip install "snowflake-snowpark-python[pandas]"Secondly, we will need to set-up a Snowpark session. This way, we can communicate to Snowflake with the API. Check the code below. There are some environment variables used, this is to make sure you will not push your passwords to a repo. Thirdly, we declare the environments. Make sure this aligns with your own Snowflake set-up.
import glob
from pathlib import Path
from snowflake.snowpark.types import PandasSeries, PandasDataFrame

# access data from snowflake
import pandas as pd
import snowflake.snowpark
from snowflake.snowpark.session import Session
from snowflake.snowpark.functions import *
from snowflake.snowpark.types import *

# Get secrets from Environment Variables
import os
import shutil


class SnowflakeDeployer:
    def __init__(self):
        self.session = self.set_sf_session()

# Initialize Snowflake session
    def set_sf_session(self):
        try:
            self.secrets = {
                'sf-account': os.environ['SF_ACCOUNT'],
                'sf-user': os.environ['SF_USER'],
                'sf-password': os.environ['SF_PASSWORD'],
                'sf-database': os.environ['SF_DATABASE']
            }
        except KeyError as e:
            print("Please set the environment variable {}".format(e))
            exit(1)

        connection_parameters = {
            "account": self.secrets['sf-account'],
            "user": self.secrets['sf-user'],
            "host": self.secrets['sf-account'] + ".snowflakecomputing.com",
            "password": self.secrets['sf-password'],
            "role": "TEST", # CHECK IF THIS ALIGNS WITH YOUR ROLE
            "warehouse": "COMPUTE_WH", # CHECK IF THIS ALIGNS WITH YOUR WAREHOUSE
            "database": self.secrets['sf-database'],
            "schema":"DATA_MODEL" # CHECK IF THIS ALIGNS WITH YOUR SCHEMA
            }
        print('Check your 3FA token to login.')
        return Session.builder.configs(connection_parameters).create()

if __name__ == "__main__":
    dep = SnowflakeDeployer()
Defining environment variables
So before we run this code, we need to set the environment variables. We use Bash. Be sure to check if you are using bash and not Powershell, in that case check this link to set environment variables.
export SF_USER=**YOUR_USERNAME**
export SF_PASSWORD=**YOUR_PASSWORD**
export SF_ACCOUNT=**YOUR_ACCOUNT**
export SF_DATABASE=**YOUR_TEST_DATABASE**
Lastly, please run the python script to see if everything is working. If everything is working, we have made our snowflake connection using the API, and can get started with our saved model.
2. Saving a model in MLFlow or Keras
The training of a model in Keras is outside the scope of this blog. If you are new to this, please check out a tutorial here.). There are a few things you should keep in mind though.
For Snowflake deployment, a folder structure is not available (as far as I could find). Therefore, we don’t use models deployed in MLFlow, as they contain this folder structure. The model you save should be a single file. In Keras, it is possible to save as .h5 file. This is what we will use for this blog. There are currently other versions available as well (.keras), but I haven’t tested this yet.
Saving in MLFlow
When saving a model in the MLFLow architecture, you need to pass an argument to make sure the model is saved in a single file. We use MLFlow as it gives you great insight into your models, and also save in their format. You can keep this format, and also add the H5 file to use for Snowflake. To do this, use the following argument:
model_info = mlflow.tensorflow.log_model(model,
                                         "path/to/save/location",
                                         input_example=x[0:10],
                                         keras_model_kwargs={"save_format": "h5"}
                                                     )
Saving in Keras
While we use MLFLow, it can be very much possible that you are using Keras. The method for saving is similar, with the only difference is that you can use a different save function. See the code below to save your model.
model.save("model.h5", save_format='h5')Normalization files (.ct)
An often experienced problem is the normalization and de-normalization of the data. As we haven’t got this integrated in our model, we use the sklearn .ct files to do normalization. The saving and loading are not defined here specifically, but work the same as the .h5 files. You can use any type of file to add to your data, but remember there is no folder structure.
Now you are able to save a .h5 file to your local (or cloud) computer. The last thing is to try to get this right using the code above. The output here should be a file model.h5.
3. Setting up a Snowflake environment
To deploy our freshly saved models, we need to push them to our snowflake environment. We’ll use a stage for this. In this section we’ll create the stage and then push the .h5 files to that stage.
To create a stage in Snowflake we can use the API. Below we see the code to create this stage. We create a stage once, and can use it afterwards constantly to push files there. Add this code in the snowflake deployer class to keep using the session.
def create_sf_stage(self):
# Create stage in Snowflake to store the model
# This function is only used the first time when starting to deploy.
self.session.sql("CREATE OR REPLACE STAGE " +
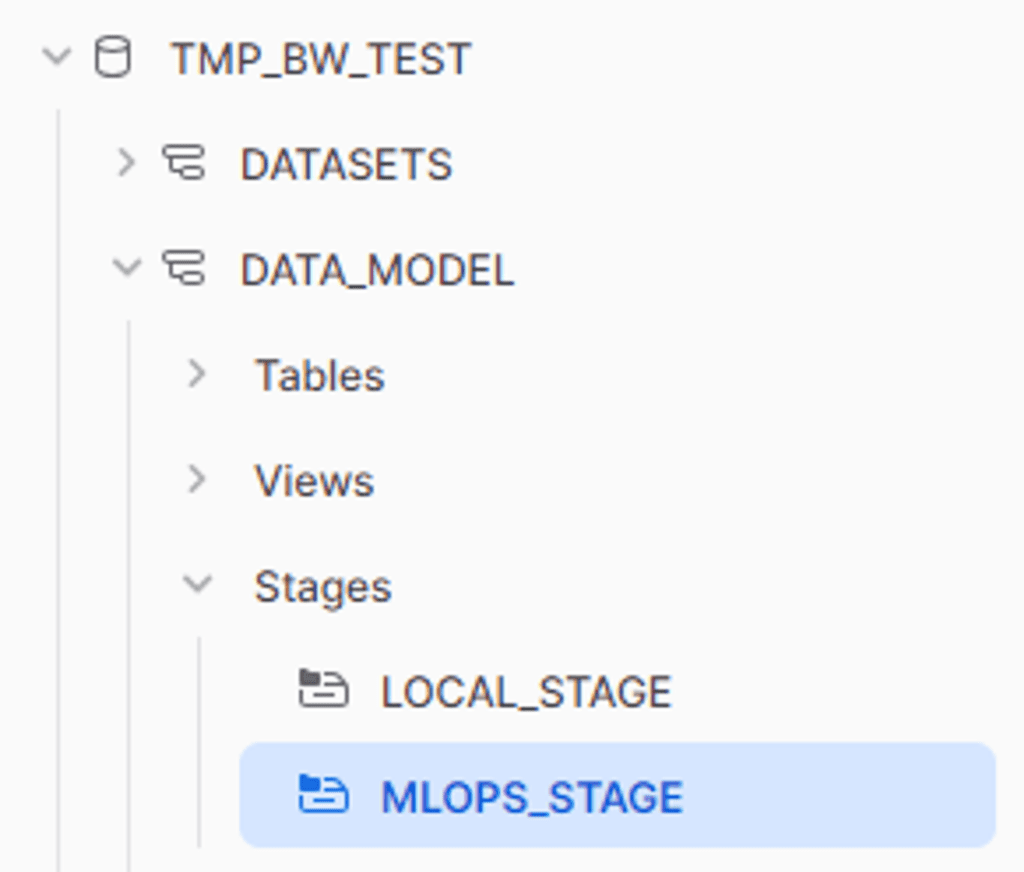
self.secrets['sf-database'] + ".DATA_MODEL.MLOPS_STAGE").collect() # CHECK IF THIS ALIGNS WITH YOUR SCHEMA
Try to create the stage. When this is done, you should be able to see it in your Snowflake UI in the data like the image below. In my case, TMP_BW_TEST is the test database.
When this is working, you can start putting files in there. For me, I added both the .h5 files and the .ct files for normalization. This function uses glob to take all the files in the models folder.
session.file.put('./data/model.h5', self.secrets['sf-database'] + ".DATA_MODEL.MLOPS_STAGE", auto_compress=False, overwrite=True)
As a last step, try to run this, having the .h5 models in your /models/ folder. When you see the files appearing in your stage in the Snowflake UI, your are good to continue.
4. Creating a Python UDF
Now, it’s time to pull everything together. So far, we’ve saved the model and created a stage in Snowflake to save the files to. Below the code is shown to make the model available in Snowflake using the Python UDF. In here, it easy to copy paste, but I’ll go through it step-by-step below.
Setting up the environment
First, the session is cleared to make sure that previous imports and packages are not added to the model.
After this, there are two important lines. The first session.add_import('@MLOPS_STAGE/model.h5') tells snowflake which models you need to import from the stage. In our case, this is just one model, but it can be more than one as well. After this, we declare the packages which are needed for the UDF. The available packages can be found in the Anaconda Snowflake channel (https://repo.anaconda.com/pkgs/snowflake/).
Loading the model
Afterwards, in the load_model() function, this function can be used to load the model. It is cached to have it readily available when there is no change. When debugging, it was nice to comment this out, as sometimes the previous version was kept when I did make a change. When you have more models, or more files to load (such as the .ct files), they can be loaded here as well.
In model = keras.models.load_model(model_file, compile=False) , compile is set to false because this solved a problem in Tensorflow 2.12.0. As soon as 2.13.0 is available on Snowflake, this can be removed as well.
Defining the UDF
Lastly, the UDF is defined. In the UDF definition (@udf...)there are some parameters set, which are pretty straightforward. The important features are in the line below (def predict…) there are 2 important values.
First, the parameter of the input is a PandasDataFrame, with two floats as input. This is also the number of input variables you will need to pass in the function of Snowflake eventually. If you change this, a new Python UDF will be made in Snowflake, with that number of input features. Other types include str or int.
After this, the output is shown. In this case a PandasSeries[’float’]. This means for each row of 2 floats, we output one float. I’ve not figured out yet how to output multiple columns, as soon as I know I’ll add that here.
In the rest of the function, the columns are names, for the users of the model to know what features should go in. After this, the model is called, and the prediction is send back.
# This clears the current session
session.clear_imports()
session.clear_packages()

# Add trained model and Python packages from Snowflake Anaconda channel available on the server-side as UDF dependencies
session.add_import('@MLOPS_STAGE/model.h5')
self.session.add_packages("pandas>=1.1.5",
                                  "tensorflow>=2.12.0",
                                  "cachetools>=1.3.0",
                                  "joblib",
                                  "h5py>=3.8.0")
@cachetools.cached(cache={})
def load_model(filename):
    import joblib
    import sys
    import os
    import tensorflow.keras as keras

    IMPORT_DIRECTORY_NAME = "snowflake_import_directory"
    import_dir = sys._xoptions[IMPORT_DIRECTORY_NAME]

    if import_dir:
        model_file = import_dir + filename
        model = keras.models.load_model(model_file, compile=False)
        return model

@udf(name='predict',session=session,replace=True,is_permanent=True,stage_location='@MLOPS_STAGE')
def predict(df: PandasDataFrame[float, float]) -> PandasSeries[float]:
    print('Loading Packages')
    import keras
    import pandas as pd

    print('Loading Columns')
    # Name your features here
		df.columns = ['FEATURE_1','FEATURE_2']

    print('Loading Packages')
    model = load_model('model.h5')
    return model.predict(df)

print('The model is deployed!')
Try to run the code now. Don’t be too happy when it works, the debugging will happen when we try to run this function in Snowflake. Let’s try this now.
5. Calling your function in Snowflake
Now it’s time to test. First, check if your function is available for your current role. This can be done using the following query in Snowflake worksheets.
SHOW USER FUNCTIONS;
This way, you see a table of the functions that have been made. Here, your predict function should be available.
If you can see your function in Snowflake, you can try to call it. As you can see below, this is done by simply calling the function as you would call any function in Snowflake. Add the features that you have defined in your python script as parameters. Note that these should be the same type, (two floats in our case).
select feature_1, feature_2, predict(feature_1, feature_2) as predicted_value
from DATABASE.DATA_MODEL.YOUR_TABLE
Just as mentioned before, if something went wrong in the python code before, you will get that error now. Check the code, and especially the intermediate steps if something goes wrong. Afterwards, you can try to make a very simple UDF to see if that is working (for example, 1 feature and add 1 to it), and then gradually add steps.
For me, it is not clear yet how to find the debug logging from python yet. If I find it, I’ll add it here later.
Costs
There were no significant cost increases since we use this model. However, it is still unclear for me how this is exactly calculated. It is taken into the Snowflake pay-per-use system, but as long as the predictions are small like ours, this is not significant. If you are processing large batches of data, it is good to check this in more depth via another source. A quick Google also didn’t result in any information for me.
Conclusion
In conclusion, deploying a Keras model in Snowflake offers a seamless way to call your models as Python User Defined Functions (UDFs) within the Snowflake environment. This integration allows you to easily invoke your models and leverage the power of Snowflake and Keras together.
However, it is important to note that there are some considerations to keep in mind. One downside of Snowflake Deployment is the lack of clear monitoring for model performance or uptime, which requires you to implement your own monitoring and management system. Additionally, the use of the .h5 file format for model saving is deprecated, and alternative formats may be explored.
There are still some loose ends for me to chase up on. First of all, the costs. They seem to be low so far, but it is difficult to predict how this will scale for bigger models. Second, the debugging of the script. It would be nice to have the python output printed somewhere, and I think this should be available. Lastly, the .h5 file is not going to be supported much longer on Keras. This should be replaced by a .keras model in a later stage.
Overall, by following the steps outlined in this blog, you can streamline your model deployment process and simplify the way you interact with your models in Snowflake.
Getting help putting AI to production
Trying to make the next step in AI development? Look at our workshops section to see how we can help.